
When I mentioned the release of “Moderne” 1930s dress pattern, I promised a bound buttonhole tutorial, so here it is!
This dress has many buttonholes, and although the original instructions called for bound buttonholes, I’m sure that hand worked or machine buttonholes would work. Still, there’s nothing like bound buttonholes for that extra special touch.
Although there’s lots of different ways to go about a lot of sewing techniques, in this tutorial I’ll go over bound buttonholes as based on the original 1930s instructions, with a little extra steps or tips I use along the way.
On this pattern for the version I made of the Moderne pattern(Version II) there are two at the neck and two at the hip. On Version I there are two at the bodice, two at the hip, and two at each sleeve. My tension on my machine is a little off at present, so please forgive the peeking stitching of non-matching thread!


For my sample I used a rayon/linen blend fabric. Make sure you test this method on scrap fabric so you can practice before putting bound buttonholes on your project. Once you feel you’ve got it down, then add it to your garment you’re making.
To make bound buttonholes you’ll need your buttons, scraps of your fabric, pins, and some form of marking device of your choosing- be it chalk or those invisible marking pens that come off with water, which is what I used. Make sure to test a swatch before you do your markings on your fabric and make sure it comes out! I also use cotton basting thread. And you’ll need pins, matching thread, and pins, of course!
Step 1:
Before you make your buttonholes make sure you use the right length for the buttons you have chosen. On this particular pattern lines were given where the original markings were, but if the buttons you choose are larger or smaller you’ll need to adjust your buttonhole length to match. I usually make mine a bit longer than the button… maybe 1/8″ or so.
Step 2:
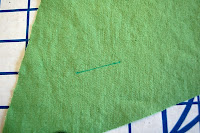
Draw a placement and length guide for your buttonhole using your method of marking in the total length you desire on your actual garment. For my sample I drew it on the right side of the fabric.

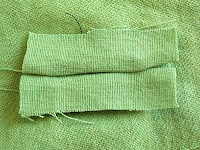
Step 3:
Using scraps of your fabric, cut squares to use for your bound buttonhole. I usually cut these a little large and them trim them down later. With fabrics that tend to fray easily this is especially helpful.
Step 4:
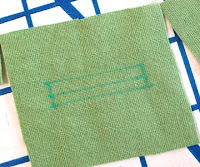
Using your method of marking and a clear ruler draw a line the same length as that of the buttonhole mark you made on your dress fabric. Now, draw a line using a clear ruler 1/8″ on either side of the line you made for your buttonhole. Square off the ends. The inside line is a cutting guide (kind of- you’ll see in a few steps), the outside line that forms a box is where you will stitch.
Step 5:
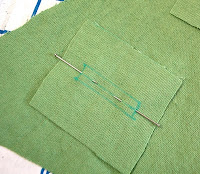
Place your scrap with your stitching guide over the top of your fabric, matching your guide lines. Do this on the right side of your fabric, the part that faces outside when you wear it. I pinned mine, but you could probably baste down the center line to match it if you find that easier.

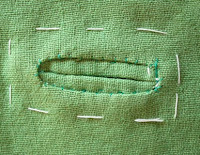
Step 6:
Stitch around the guidelines, making a box shape. I used contrast thread so you could see it, but you should use matching thread.

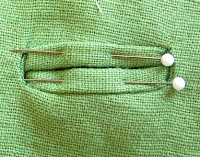
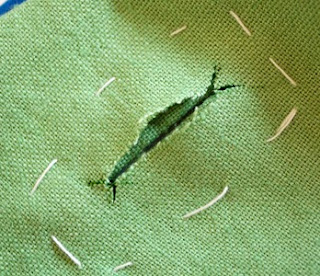
Step 7:
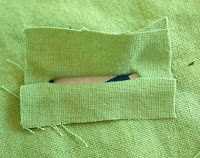
Clip along the inside line through both layers of fabric, but not to the edge of the line! About 1/4″ from the edge, or a little closer on either edge, taper to a “V” shape, and clip to the corners, not all the way to the thread or else it will unravel, but very close so that when you turn in your buttonhole it lays flat and doesn’t bunch.

Step 8:
Here’s the tricky part- flip your buttonhole through the opening and to the wrong side of the fabric. I like to open mine all the way so it lays flat to make sure I have my corners clipped enough first. Then you make a sort of box pleat on either side of the buttonhole, do one side first and then the other side, making sure your bound fabric covers the 1/8″ seam allowance flush. The seam allowance for the buttonhole should be faced toward the center of the opening on each side, not out. By contrast, the seam allowance on the sides of the buttonhole should face out, or away from the center of the buttonhole. Take your time to get it to lay flat and correctly. Tack by hand in matching thread where the “pleat” matches at the inside edge of the side of the buttonhole to secure it in place. If you cut your binding piece large, trim it down now so that you can remove excess bulk but also have enough seam allowance on the inside, past where your initial sewing “box” was placed, if you could see it on the inside. Use at least 1/4″ seam allowance, but I use a little more.
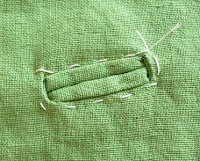
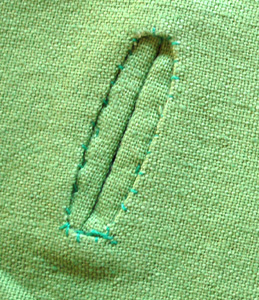
Step 9:
Once you get your buttonhole laying flat and the way you want it, pin it to hold it in place. I then baste around my buttonhole to hold it in place, making sure the underside lays flat.
You’ll have to look at the way your garment is constructed based on what pattern you are using to see when you do this step, but this is the finishing for the buttonholes so it might be towards the end of when you make your garment. After you attach your facings or underside of the garment, you will lay the garment flat underneath and make sure everything lines up flush with no wrinkles. Listen to the grains of your fabrics- if they’re fighting against each other for drape, so make sure you get the fabrics behaving themselves and laying together in harmony. It wasn’t an issue at all for me when constructing this dress, but with some things like jackets this can be a little tricky sometimes.
In this step I lay my facings flush with my self piece, and pin it on the outside. I choose to baste around the outside of the buttonhole with basting thread to hold the pieces together and keep my placement so that when I handled the buttonhole from the inside it wouldn’t move around.

Step 11:
There’s probably different methods of doing this step, but this is what works for me. On the outside of your buttonhole, very carefully snip right down the center line through the facing piece, but avoiding cutting the buttonhole you just bound. Then flip to the inside and clip to the corners, as you did when you attached the binding piece. Be very careful on this step not to clip too far!
Step 12:
Turn in the seam allowance on either side, forming a “box” on the inside of the garment, around the buttonhole, covering the stitch lines. Stitch this part by hand all the way around using small stitches and matching thread (mine’s not matching so you can see).
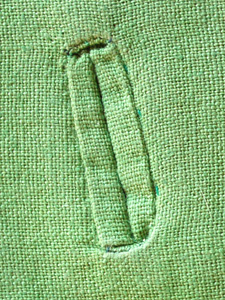
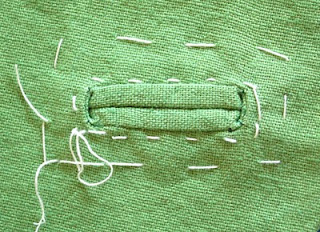
Step 13:
Remove the basting thread, press, and you’re finished! Here’s a view of the buttonhole from the outside and inside. Please forgive my sloppy handwork!
Ta Da! Bound buttonholes!
Hope you find this useful! I find bound buttonholes especially fun when done with contrast fabric. Or maybe even a print? Wouldn’t a silk or wool or velvet blazer look dreamy with plaid silk taffeta bound buttonholes? Or maybe a solid garment with bias striped bound buttonholes and trim? Yum!
