

All tutorials originally posted on my blog.
Intro to the Bias Binding/Bias Facing Tutorial Posts
Pre-made bias fold is pretty darn old, and whoever came up with the idea of pre-packaging pre-folded bias tape was a genius. I first started using bias tape with quilting- where you often make your own bias tape from fashion fabric. It doesn’t take a long time to make your own bias tape, but it is kind of a pain in the butt if you just want to get to sewing!
A lot of patterns from the 1920′s through the 1940s call for pre-made or self-made bias tape (often called bias facing or bias binding). Bias tape was most often used to finish edges, though it could be decorative as well. In the 1950′s it became more popular to face pieces with self fabric and patterns included separate pattern pieces for this purpose, but in the earlier pattern many times facings were not included and you were told to finish edges with bias tape or seam binding. Take a peek into a 1940′s dress if you have one in your closet and you may see this (or self fabric bias instead of tape). This actually helped conserve fabric, as every little bit you could cut out of fabric usage was the mode of the day in the 1940s! Pattern companies had to stick to rigid codes of how much fabric their patterns took to make, just like ready to wear clothing makers. Just think of it- the Great Depression and called for ingenuity (lots of books were put out in the late 1920′s to early 1930′s of how to do fashions and home decor with bias tape as accents), and then WWII fabric rationing. Bias tape totally makes sense!
Bias Binding
These days most people attach bias in two steps. First you attach one edge, then encase the seam you just made by turning the bias over to the other side and stitching it to place. In earlier decades this was just one of the methods to be used. The other was to attach the bias binding all in one step, which I’m going to show here, and what the pattern the 1940′s apron was based on called for. It’s actually a quicker method and uses less thread- and since aprons were meant just as a handy household item, high sewing techniques were not always called for. An apron was a useful item. As long as it was sturdy and did the job, that was what was needed!
THE BASICS
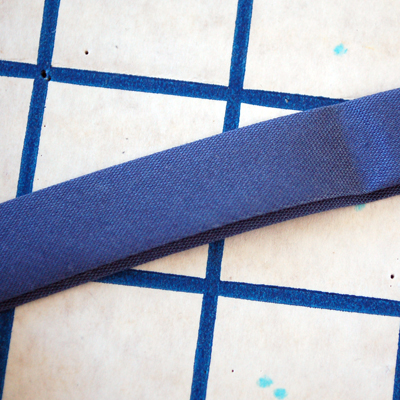
For bias binding we are using pre-packaged DOUBLE FOLD 1/2″ bias tape. This is how the pre-made bias binding comes- notice that one side of the fold is longer than the other. You want the longer side to be on the WRONG side of the fabric. The shorter side should be on the RIGHT side of the fabric (the side of the fabric which your print is on, or the outside of the garment).
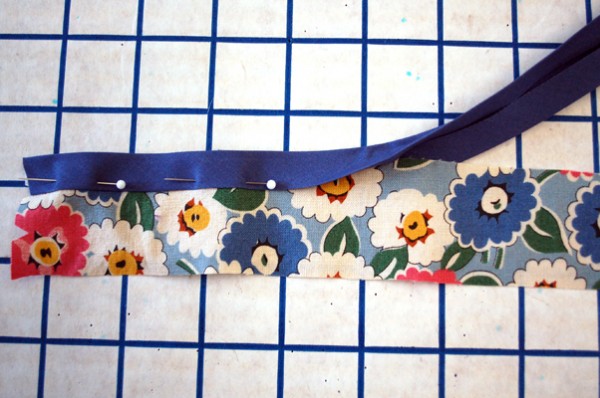
Here you can see pinning the bias to the fabric. You want the inside fold of the bias to meet with the cut edge of the fabric so it sits in there snugly. Sandwich your fabric between the bias tape. Straight edges are super easy. Just do this and pin it to place.
Many more pics! Click the link below to keep reading! If you don’t see a link, you’re on the right page ![]()
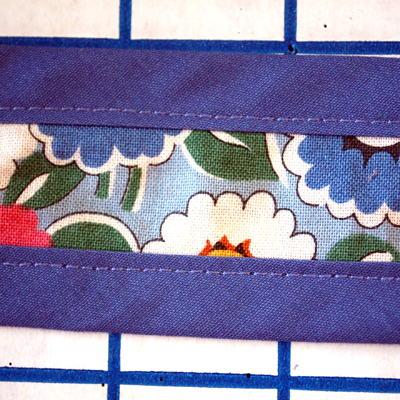
After this you just stitch through all layers at once, close to the edge of the bias. Easy right? For gradual curves you do the same thing. You just ease it in so that it lays flat and don’t forget to use pins. I am an avid no-pin user (when I can help it, just ’cause I’m lazy), but I find pins totally necessary to attaching bias successfully. Make sure when you sew your bias you do not pull it tight, as it will make the fabric pucker after you’re done. And don’t forget to leave yourself a little on the end of each piece. After you’re finished stitching them you can trim off the excess.
MITERED OUTSIDE CORNERS
Corners get a little more tricky. Here we are finishing the apron tie ends. Since we are using 1/2″ bias tape for this project I am going to use instructions suitable for that. Whatever size bias you’re using, just substitute this method for that measurement. Folding the corners in when sewing on your bias binding or facing is called “Mitering”, so they are called “Mitered Corners”.
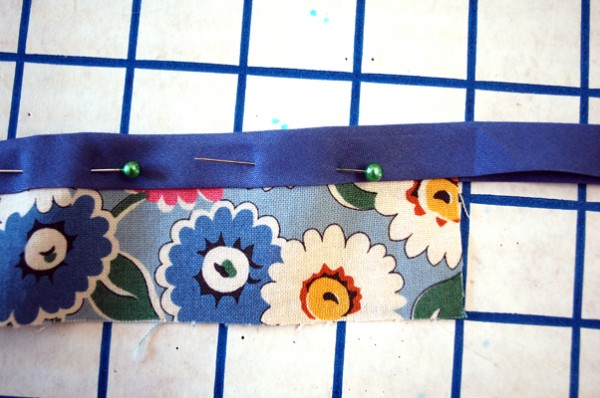
When you get toward the end of the edge to be bound, leave your last pin a little further back more than your seam allowance of the next seam to be bound (in this case, the seam allowance is 1/2″, so you will make sure your pin is a little further back than this.
Now, this next step I’m showing with a ruler so you can get a better idea of what to do. Once you’re familiar with doing bias you can leave the measuring off and just go by eye.
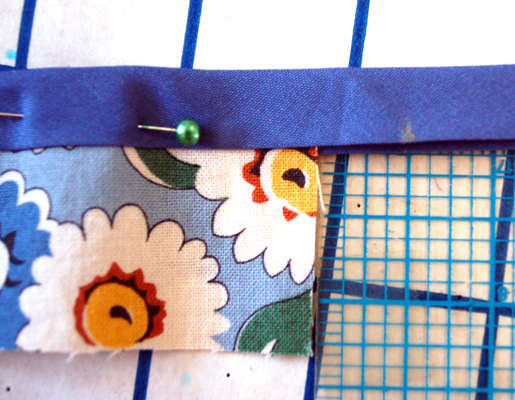
Using a ruler, make yourself a mark 1/2″ past the fabric edge on your bias binding. Make sure your method of marking will come off of your finished garment! In the next steps you will match this mark up with the edge of the bias, so the fold hits at a 45 degree angle. Watch…
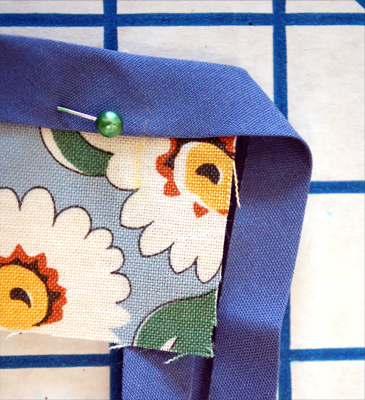
Open up the bias flat on the edge you’re going to bind next (See towards the bottom of the pic, the bias is open, with the fabric on top). You’re going to butt that cut fabric edge right up into the fold, like you did previously, but this time the corner you’re going to bind should make the binding hit at a 45 degree angle when you fold it from the edge the mark you just made (see at the top?), and when you see it on the WRONG side, it kind of looks like an arrow:
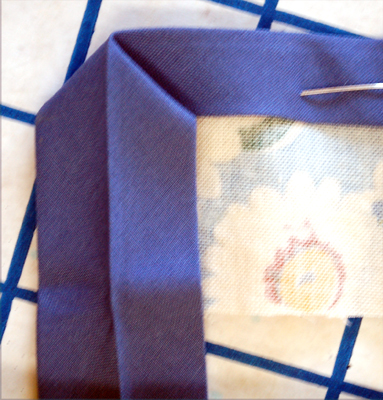
Sorry, this picture came out blurry, but you can see what I mean. Looks like a point or arrow from the back side, or WRONG side of the piece being bound. You can see my little yellow mark on the left side of the arrow, so you can see the angle I’m talking about.

Back on the right side of the fabric, fold that open bias down, and you’ll get this. The intersecting point of the bias binding should be where your little mark you made with the ruler hits. Put a pin here to hold it to place. The follow the same steps you just did when you round the other corner.
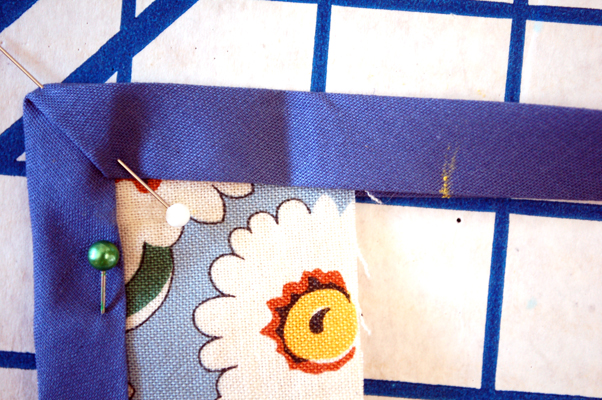
Make a mark 1/2″ past the edge.
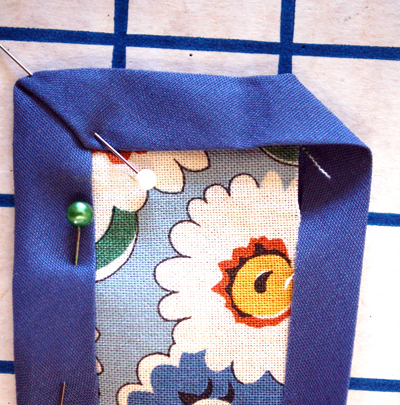
Open the bias on the other side and make your “arrow”.
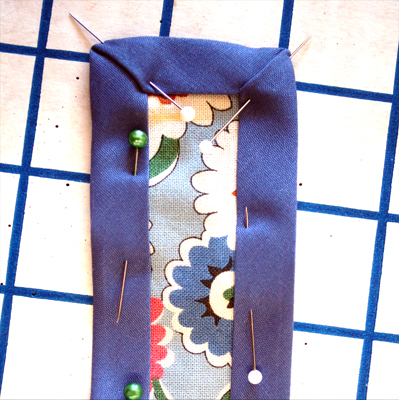
Fold the bias over the raw fabric edge, encasing it, and pin the remaining straight edge.
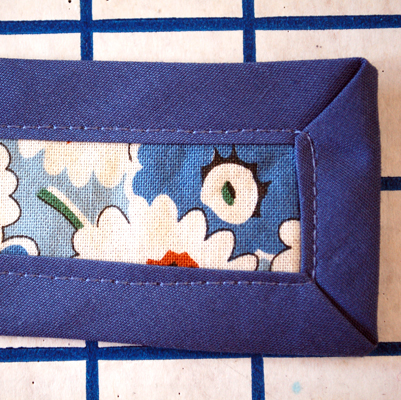
Now you just slowly stitch the bias tape onto your piece close to the edge, removing pins as you go. When you get to your corners I find it helpful to turn in the “needle down” position, and sort of pivot the piece around the down needle, then keep stitching. My stitching a little wobbly here, but you get the general idea.
This post is continuing on how to bind edges with one step bias binding. If you missed the previous post, you can find it here.
Binding Curves
In the apron pattern these tutorials were made for, there are two somewhat more extreme curves for the heart pocket. In this tutorial I will show a method to make binding these curves easier. Of course, all these tutorials can be applied to a variety of dressmaking or crafting circumstances. In fact, the first time I learned this technique was when I was being mentored by the milliner at the Opera where I worked. She used this method both for bias binding and for shaping petersham ribbon for the inside of hat bands. This method might take a few practices, but once you’ve got it down it’s so much easier than trying to ease in a lot of bias edge into a small space! The problem with pulling the bias tight to fit is that when it’s sewn down the piece will not lay flat. It will force the fabric to pull in and “pucker”. You can use this same technique of pressing your curves to make sewing easier for bias binding, bias facings, and petersham ribbon.
For binding edges with curves, you want to make sure to fit the bias, without tension or pulling, to the largest curve. In this case, the longest or outside edge of the curve to be bound is at the cut edge. If you were binding an curve that goes inside a garment (like an armscye or a scooped neckline) your longer or outside part of the curve to be bound would be at the seam allowance line, where you attach your binding, so you’d do this process in the opposite way and make the curve in the opposite way. But I’m getting ahead of myself. Hard to teach this without being in person, but here ‘goes ![]()
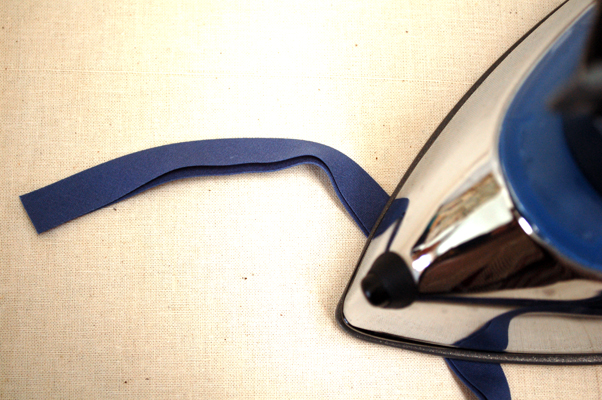
First, take your bias tape, just like in the previous post, with the longer edge of the fold to be on the WRONG side of the fabric. To ease around this curve we are going to first shape the bias tape with our iron and some steam. I have the iron sitting on top here so you can see what sort of curve we’re going to try to get, with the outside edge of the curve being the fold (where it will snug into the outside of the pocket piece.) If you were doing a neckline or armscyes, you’d do this the opposite way, with the outside end of the curve being the open end and the fold being the inside end of the curve (if you were to measure each side of the bias, you would find one is shorter in measurement than the other).
Click on the link below to keep reading! If you don’t see a link you’re in the right place ![]()
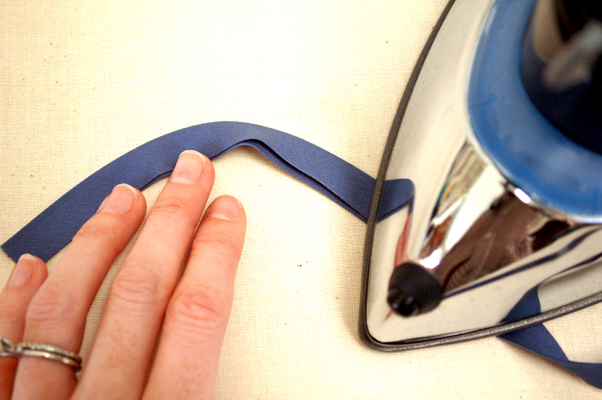
You’re going to be VERY careful (don’t burn yourself with the iron or the steam!) and use the point of the iron. You create a sort of tension with one edge of the bias using your hand to guide the bias, and the other hand to create pressure on the iron, and slowly press the bias tape into submission, being careful not to create folds or creases in the bias tape.
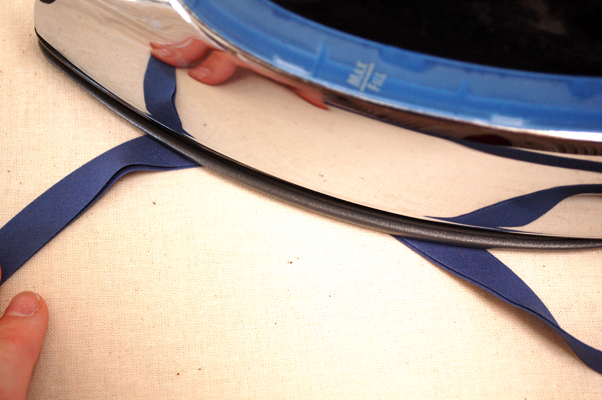
After I get my curve started I’ll often use the longer part of the iron to help press it in place, then keep moving down the bias tape, using a combination of these two pressing techniques.
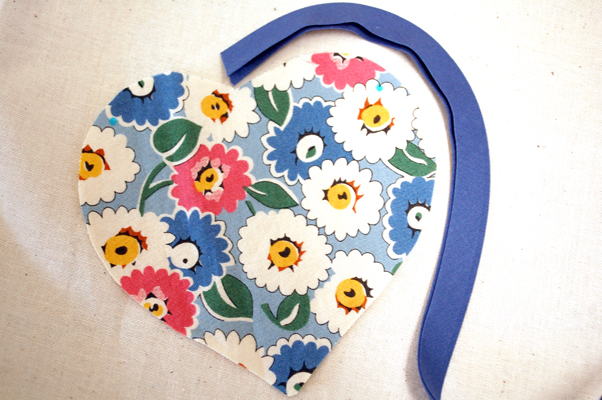
Once I’ve got a pretty good curve going on my bias, I’ll compare it to the piece to be bound. Here you can see it’s pretty close, so I kept this piece as is. The little extra I’ll have to ease in is nothing in comparison to what I would have had to ease in before pressing!
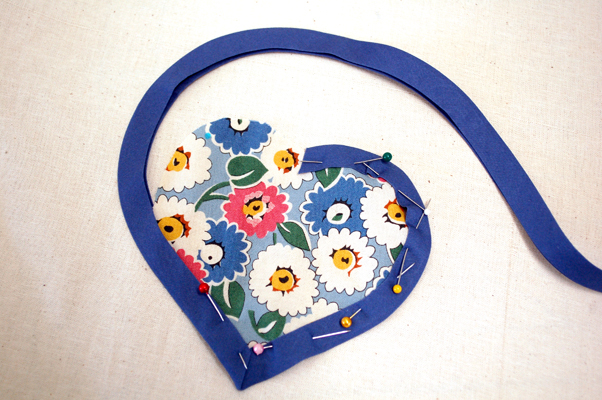
Here I have pinned the curve to place. At the bottom of the heart I’ve bound it in a similar method we learned in the last post, on mitering outside edges. After I got my point pinned to place I went ahead and shaped the other side of the curve. I think I actually moved the pin after this picture was taken to be closer to the point so I had more leverage with the bias.
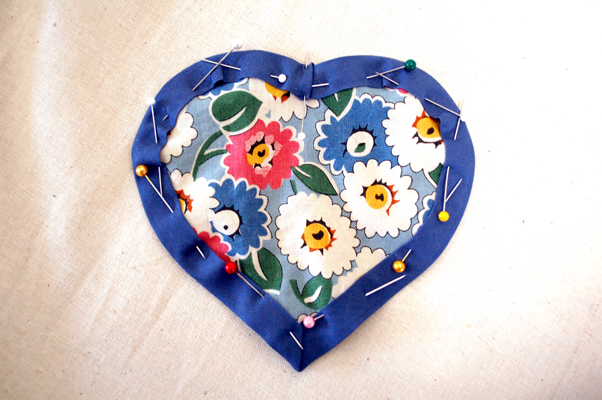
Here you can see the bias pinned to the heart pocket. Don’t forget to fold under your bias to finish the edge at the join! The excess length of the bias binding was cut off AFTER I got to the end of working my way around the piece and a little extra was left on to fold uuder to finish the edge. If I did this again, I might have started at the bottom point, since it was rather fiddly to get the bias to fold in at the top point ![]()
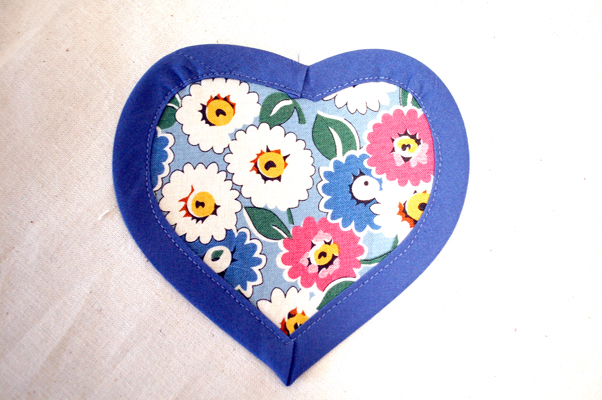
Stitch on your bias, through all layers at once. Go slowly, removing pins as you go. When you get to the bottom point pivot your pocket so the unsewn edge is facing you and then keep stitching! When you’re done don’t forget to give it one final press to make sure everything’s laying nice and smooth and flat before attaching it to your apron (or whatever you’re making using this technique!)
Remember, practice makes perfect, so don’t worry if you don’t get it right first try! And if you’re having problems with your ends, you can always selvage your piece by adding a bit of trim or a button to cover it. Don’t toss it just because the end isn’t perfect- you can always try again!
This is the last installment in the series for bias binding using the one-step method of attaching both ends of the bias at once (not the sew one side, flip over, then sew the other side as used most often now-a-days). In this blog post we’ll learn to bind inside corners. After this you should be all set to sew the bias bound version of the 1940′s apron pattern! Of course, all of these techniques can be applied to any sewing or craft project you are making that needs to have bias binding attached.
Mitering Inside Corners
We previously learned how to miter the outside corners, and attach bias on curves, so now we’re ready for the rest of the apron construction! This method can be used for the scallops but should also be used for a sweetheart neckline.
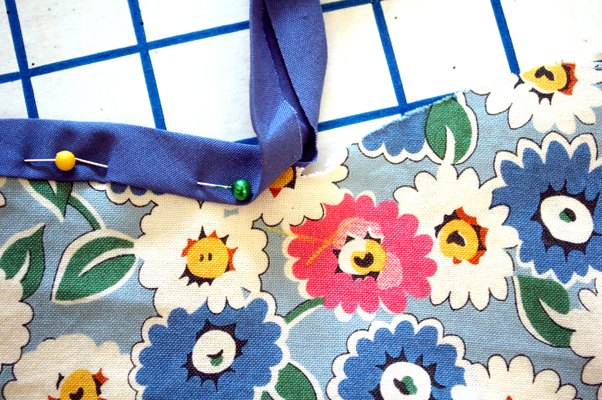
Here you find me nearing my first scallop to be bound. See the point on the outside? The area you will need to bind will actually be a bit more of a drastic point. To help aid with getting this point right on my bias binding, so it lays flat and smooth, I have given myself a cross line to match (in yellow on the piece). Of course, make sure your method of marking will come out of your finished garment! To draw my cross marks I used a clear ruler and measured in 1/2″ from one edge, drew a line, then 1/2″ from the edge of the next scallop, and drew another line (if your bias binding is a different size, substitute that measurement for the 1/2″). Where those two lines intersect you are going to make your point. The excess will be folded in, so it rounds the corner nice and smoothly. Here we go…
Click the link below to keep reading. If you see no link you’re on the right page!
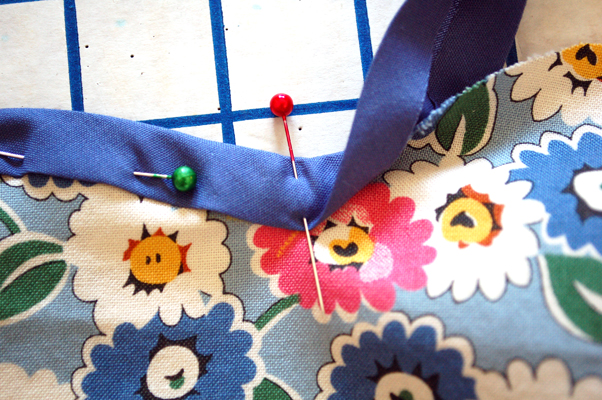
Match your bias up the cross mark. There that line intersect give yourself a cross pin, going through all layers. This will hold your pivot point in place and help you get your miter right!
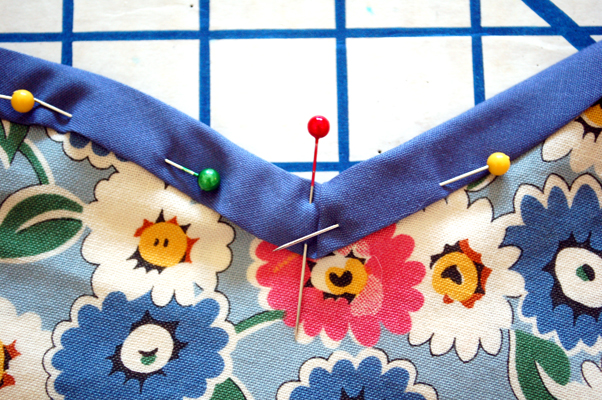
Now you fold the bias up to go along the next curve. See the inside point where you made your cross-mark? That’s the crucial part of this construction. Take the unsecured end of bias you’re going to be binding this curve with next and line it up, keeping the “point”, and easing it. There should be some excess binding there at the outside edge. Using your fingers, make your bias binding fold over the excess binding (so there’s a tuck on the inside of the binding). This sometimes is a bit tricky, so just hang on and try it until you get it right. If it’s a small scallop you might have barely any tuck there. If it’s a big corner, you might have more. Keep on pinning all around the piece to be bound using this method. Use lots of pins. You can use another cross pin to hold your tucks. I forgot to do that in the pic. As you slowly sew the bias down as you did in the previous posts, remove your pins. Don’t forget to give it a good press after you’re finished sewing!
That’s it! Now you’re all set for doing binding all in one step!
Next up for tutorials we’ll be doing bias facing, but since you’re old pros at binding by now the facing will be a breeze! It’s the same concepts of mitering corners, but you face the garment with bias tape instead of binding a cut edge.
We’ve got bias binding under our belt, so now we’re moving on to bias facing. If you look at the 1940′s Apron Pattern sample photos, the one done with bias facing is the one in red and white. Unlike the blue apron, where you can see the binding externally in a contrast blue, kind of like a trim, the red and white apron has the facing tucked to the inside of the garment, invisible from the outside.
Bias Facing- The Basics
Bias facing can be made either from store bought pre-packaged SINGLE FOLD bias tape, or can be made from your fashion fabric. Most often times in vintage clothing it will be made to match the fashion fabric and cut from scraps. You would use the bias facing to finish edges like necklines, armscyes of sleeveless garments, the bottom of sleeves, or even a curved wrap skirt (like the Sunkissed Sweetheart pattern, where the top and the skirt are both finished with bias facing). In fact, the more you get into vintage sewing the more you’ll find that construction calls for edges to be finished with bias facing! In pre-1950′s patterns, as mentioned previously, it was more common for patterns to call for bias facing than to include facing pieces. It’s a great skill to have under your belt.
With all instructions given for marking make sure you use a fabric pen, chalk, or marker that will come out of your finished garment! Test it on a scrap of fabric before construction to make sure!
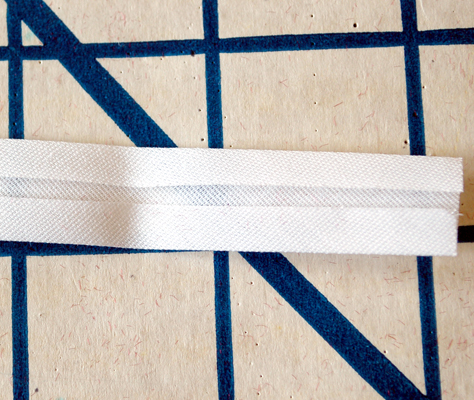
For this tutorial we will be using store bought single fold bias tape. You can apply the same methods for self fabric bias tape made from fashion fabric after you cut your strips and press them (which we aren’t going to cover in this tutorial). Above you see the single fold bias tape out of the package with the wrong side facing up so you can see how it’s pressed. I always wondered why it was called single fold bias tape when there’s obviously two pressed edges ![]() But with the double fold bias tape, like you saw in the bias binding tutorials, you basically get one of these strips that’s then pressed in half lengthwise. So for bias facing make sure you get the single fold. For this apron we use 1/2″ single fold bias tape.
But with the double fold bias tape, like you saw in the bias binding tutorials, you basically get one of these strips that’s then pressed in half lengthwise. So for bias facing make sure you get the single fold. For this apron we use 1/2″ single fold bias tape.
Click the link below to keep reading. If you don’t see a link, you’re in the right place!
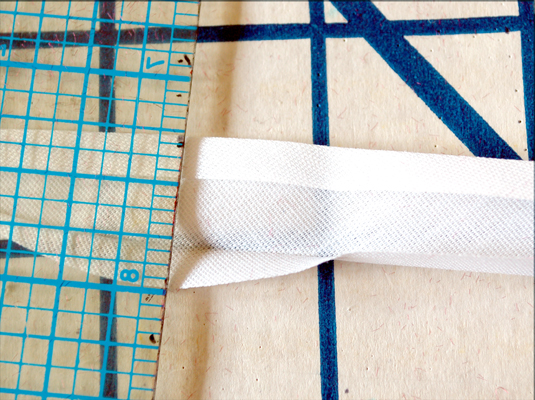
Here I have the bias tape opened with the ruler. See that fold line on the inside? You are going to use that for your stitch line guide. The standard for bias tape is 1/4″ seam allowance. Since the seam allowance on our pattern is 1/2″ we will need to make sure we finish the apron edge 1/2″ from the cut edge.
The first way to prepare your edge, which I didn’t photograph, is to pre-cut 1/4″ from the edge you are going to bind before you add the bias tape. Use a clear ruler and measure in 1/4″ from the cut edge you are going to bind and draw yourself a line. Then cut that 1/4″ off using the line you drew as a guide. When you attach the bias binding you will match cut edge to cut edge. The second way we are going to show below:
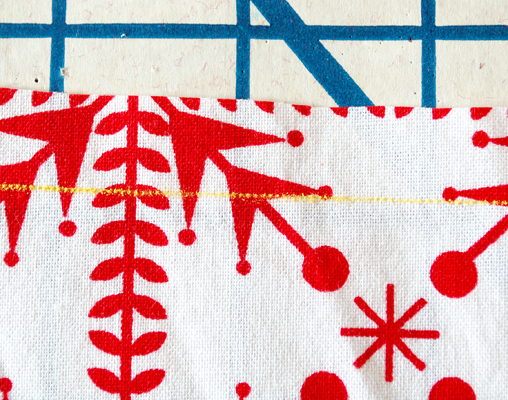
I forgot to take a photograph of this as I was constructing the apron, so I had to substitute the contrast fabric here. In reality, this should be the same fabric as the other images ![]() Above we showed the 1/4″ fold of the bias tape that you use as a stitch guide. If the edge you’re binding has 1/2″ seam allowance, and you don’t want to pre-cut the edges, you are going to measure in 1/2″ from the edge. Here I have drawn a line, which is your apron stitch line. That line should match up with your stitch line (fold) of your bias tape.
Above we showed the 1/4″ fold of the bias tape that you use as a stitch guide. If the edge you’re binding has 1/2″ seam allowance, and you don’t want to pre-cut the edges, you are going to measure in 1/2″ from the edge. Here I have drawn a line, which is your apron stitch line. That line should match up with your stitch line (fold) of your bias tape.
Alternately, you could draw a 1/4″ line, like described before, and match up the bias tape cut edge to the 1/4″ line. Basically, what you want to do is make sure the bias tape cut edge is in 1/4″ from the fabric cut edge. Important! If you are making a garment using a delicate fabric that will not be washed by machine (like dry clean only materials) you will not want to draw on your seam line on your fashion fabric. Either pre-cut your edge or draw the line to match up with the edges, as described in this paragraph. For all following instructions, substitute that method for the one that shows drawing on seam allowance lines.
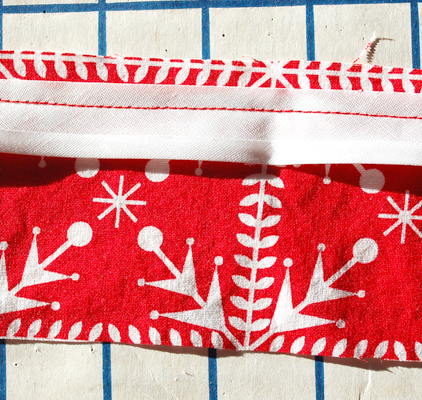
Here you see the bias tape on top of the fashion fabric, right sides together. Notice how the bias tape cut edge is in 1/4″ from the fabric cut edge. You stitch inside the bias fold, using the pressed fold as a guide, as you can see in the photo above.
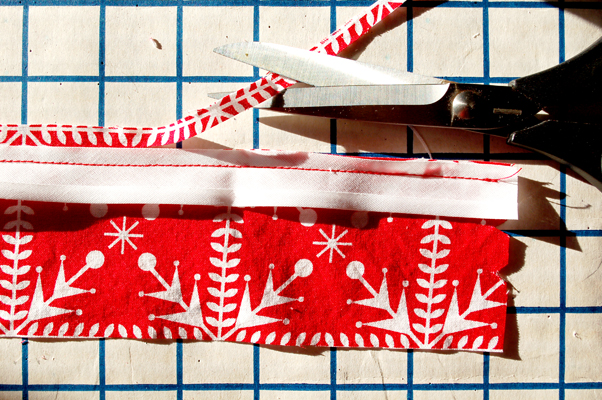
Next you cut your seam allowance down to match. “Wait a second,” you might say, “I thought trimming the seam allowance was an option?”. Sorry, gotta trim them sooner or later. If you don’t trim the seam allowance off before you finish your edges your fabric cut edge will match the finished fold edge of the bias on the inside and when you wash it you’ll get all sorts of little threads peeking out everywhere. No one wants that, right? More work now, less thread trimming later ![]()
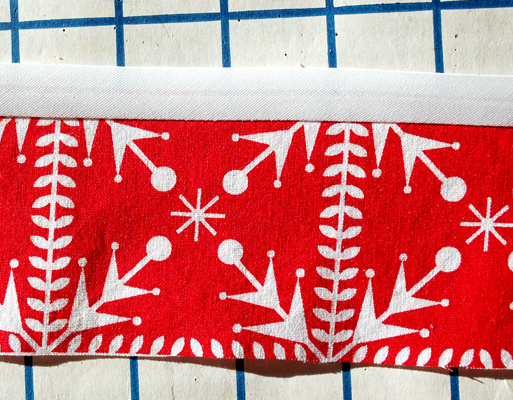
Next step is to press the bias fold and seam allowance up, like shown above. You want all the seam allowance and the bias to be going in the same direction. If I was finishing a garment like a blouse I would now run a line of stitching VERY close to the line where the fabric meets the bias, on top of the bias tape to secure the seam allowance all in the same direction, away from the body of the piece. That helps tame the seam allowance and gets your finished edge to lay nice and crisp. But right now, since it’s just an apron, we’re going to skip that step.
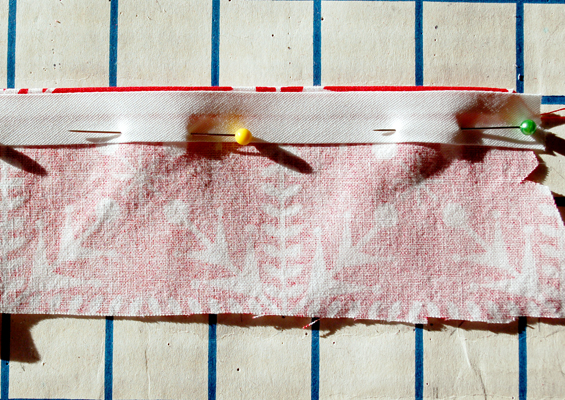
Back to the iron! Press the bias and all seam allowance to the inside of the garment. You can see in the photo above that I’ve got a teeny bit of a roll of where the fashion fabric is peeking through. That’s a good thing. That teeny little roll of fabric means that your facing will not be visible from the outside of your garment. Don’t add too much of a roll to the inside, though, or your pieces will not match up correctly. Just a smidge… say 1/16″. Pin your bias facing down, nice and smooth, on the inside of your garment.
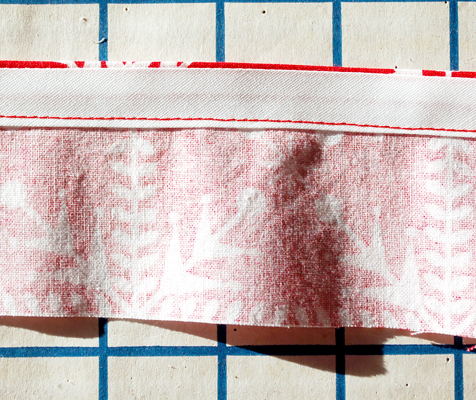
Now stitch down your bias facing close to the bias fold edge. Don’t forget to use a color that matches the outside of your garment! Since this is an apron (aka a useful object) I’m not stressing about the machine stitches being visible on the outside. If this was a blouse or garment, or if I wanted to get picky, I would stitch down this edge by hand so the stitching would not be as noticeable. If you’re a rick rack fan and you’re making a garment like this, an option would be to add trim on top of your machine stitching to cover it.
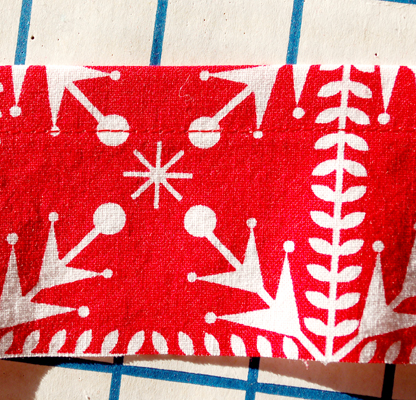
The last photo we see the edge we just finished on the outside (right side) of the garment. Ta Da!
Continuing the how-to tutorials on bias binding and bias facing, here is how to use bias tape to face the outside corners. You can find the intro to bias facing here, and you can find the tutorial for finishing outside corners with bias binding here. We will be building upon techniques already learned in these tutorials, so if you feel like you’re missing out on something go back and read the previous posts in this how-to series.
Facing Outside Corners with Bias Tape
This technique is not actually used in the 1940′s apron pattern that prompted me to do these tutorials, but for future reference I thought it would be a good idea to include this, in case you are following a pattern that needs outside corners faced.
For this tutorial I am using contrast thread so that you can see my stitching. Don’t be like me. Use thread that matches the fashion fabric of your project!
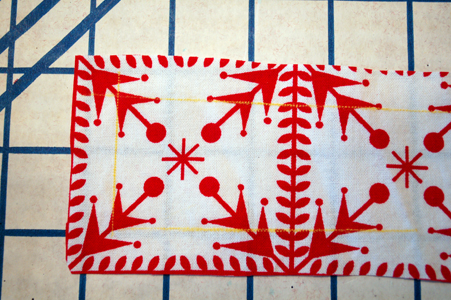
First step to to is to figure out your seam allowance. We’re pretending the seam allowance of this hypothetical project is 1/2″. Draw your seam lines in 1/2″ from the edges to be bound using a clear ruler and a method of marking that will come out of my fashion fabric when I wash it. Important! If you are making a garment using a fabric that will not be washed by machine (like dry clean only materials) you will not want to draw on your seam line on your fashion fabric. Either pre-cut your edge or draw the line to match up with the cut edge of the bias binding, as described in a previous post. For all following instructions, substitute either method for the one that shows drawing on seam allowance lines.
Click the link below to continue reading. If you don’t see a link you’re in the right place!
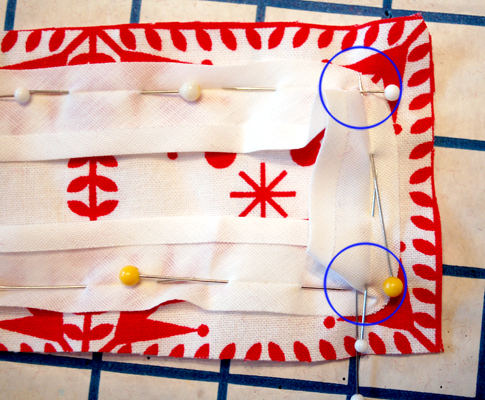
Like we did in the last post, we’re matching our two stitch lines together at 1/2″ from the cut edge of the project. Leave tails on the bias at the beginning and end of your project- you can always cut the extra bias off later! Go along your straight edge and when you get to the corners you need to turn, make sure the STITCH LINE (the folded crease in the bias tape) matches the POINT of your drawn stitch line on your fashion fabric. Don’t pay any attention to where the bias folds, or what the cut edges are doing since you’ve already tamed them to where they need to be with pins. The most important part is to get those corners of those stitch lines matched up, as you can see above in the circles. Mine’s got a little bit of a tuck there (again, don’t be like me ![]() ). It is best to not have that tuck, to make it nice and smooth, and get your line to pivot at that point just right.
). It is best to not have that tuck, to make it nice and smooth, and get your line to pivot at that point just right.
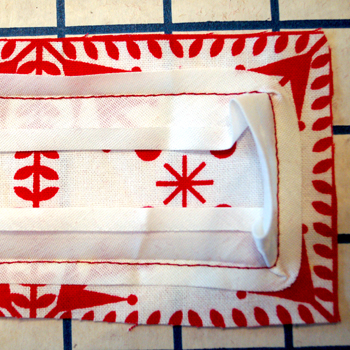
Stitch the two pieces together following the stitch lines and pivoting your stitching at the points. I find it best to put the machine into “needle down” position at that point, then turn the piece to be facing towards you, then continue stitching.
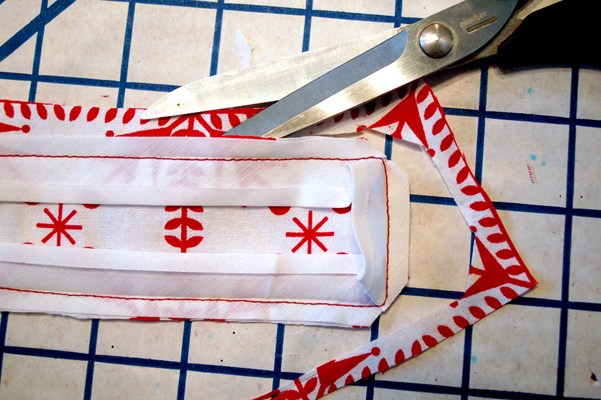
Next, clip off your seam allowances to match. See the corners of the piece? You can see I trimmed them at an angle. When you turn the piece it will make the corners not as bulky. Do this for any facings (bias or otherwise) you do which have corners, it will make them lay nice and smoothly!
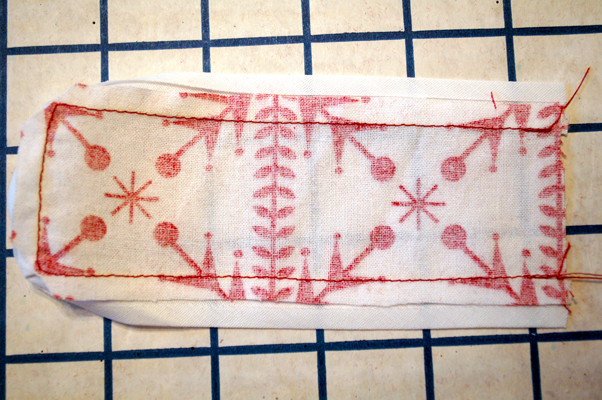
Press this piece, similar to the method you used in the last post, with all seam allowances pointing away from the fashion fabric, towards the bias facing.
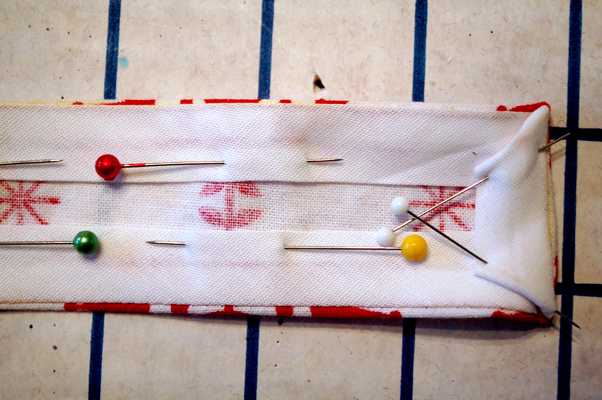
Then you turn the edges in and press again. Remember to give a tiny roll to the edge of the fabric (just enough! Like 1/16″, but not more). Notice the folds of the bias facing are at an angle where they fold back to bind the end of the piece. If you can get your bias tape to fold at an even sharper angle, so the edges of the tape match up flush with the fold, that would be better. The most important thing is that the bias lays flat and smoothly, and is not visible from the outside of the garment. If you can’t get a sharper angle, don’t worry. I don’t think the bias facing police are going to be checking on you ![]()
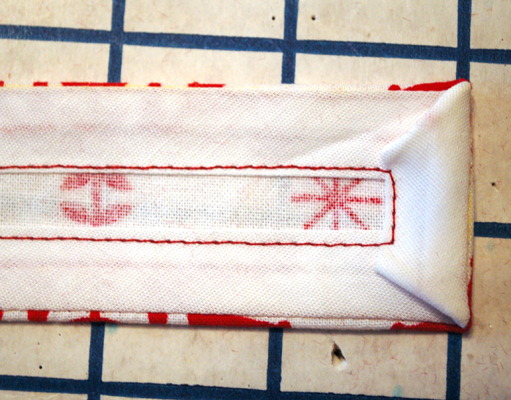
Now stitch on your bias facing, close to the fold, and pivoting at the corners, in a continuous stitch. Where your extra flaps might be at the folds you will want to tack down by hand. Doing this will help the facings stay in place and keep them from getting caught on things. Give it a final press and you’re done!
There we go! Outside edges! Next up we’re doing inside curves, which also aren’t used on the apron pattern, but are handy when doing armholes or scooped necklines.
In this section of the bias facing tutorials we’re going to learn how to face inside curves. In the 1940′s Apron pattern which prompted these tutorials, there are no extreme inside curves to bind so you won’t need to do this. However, bias facing for inside curves is prevalent in vintage sewing- you usually see it used for necklines (like the Sunkissed Sweetheart pattern) or for armscyes (like the 1930′s Jumper Dress pattern). Here I’m showing how to sew an inside curve with a sample so you can get an idea of what do do for your project.
We are building upon techniques learned in the previous posts. If you feel like you’re missing out on something make sure you go back and re-read the previous posts in this how-to series.
Bias Facing for Inside Curves
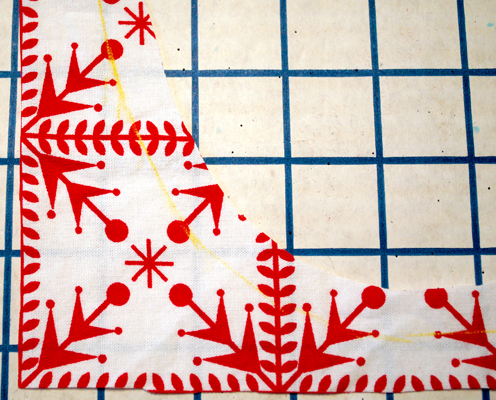
First thing you’re going to do, like in the previous posts with bias facing, is figure out where you want your seam line to be. For this hypothetical project, we’re using 1/2″ seam allowance, so I drew my line 1/2″ from the cut edge of the fabric. Important! Test a scrap of your fabric with your marking method to make sure it will come out when the garment is washed. If you are making a garment using a fabric that will not be washed by machine (like dry clean only materials) you will not want to draw on your seam line on your fashion fabric. Either pre-cut your edge or draw the line to match up with the cut edge of the bias binding, as described in a previous post. For all following instructions, substitute either method for the one that shows drawing on seam allowance lines.
Click the link below to continue reading. If you don’t see a link, you’re in the right place!
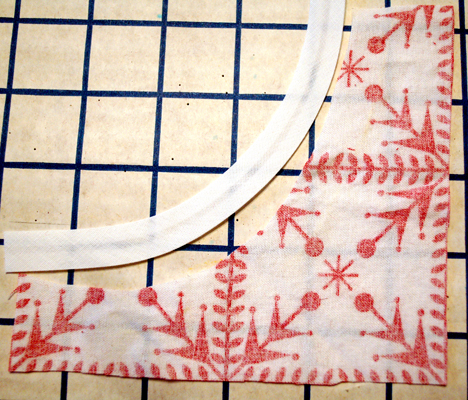
Using the technique of pressing the bias to a curve we learned in the previous post of bias bindings + curves, press your bias with steam match your pattern piece to be faced. You will want your bias to be longer than your fashion fabric (which I forgot to do in these how-to pics). Leave a little bit of a tail at either end. You can cut them off later.
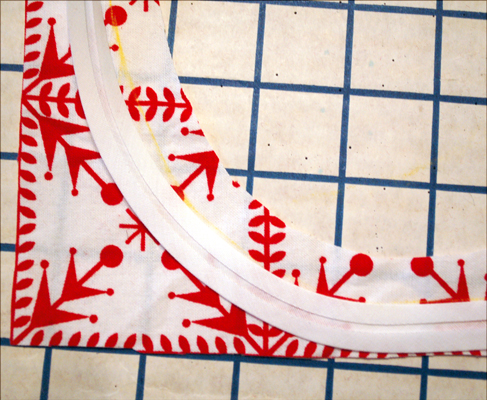
Match the bias on the right side of the piece to be bound also. Here you can see the pressed curve of my bias matches the dawn stitch line of my self fabric very nicely.
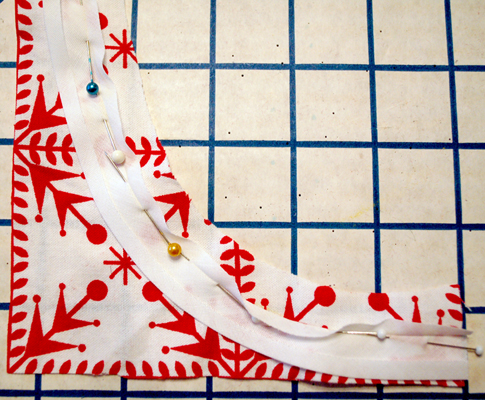
Pin your pattern piece to the curve, matching stitch lines, as we did in the previous posts.
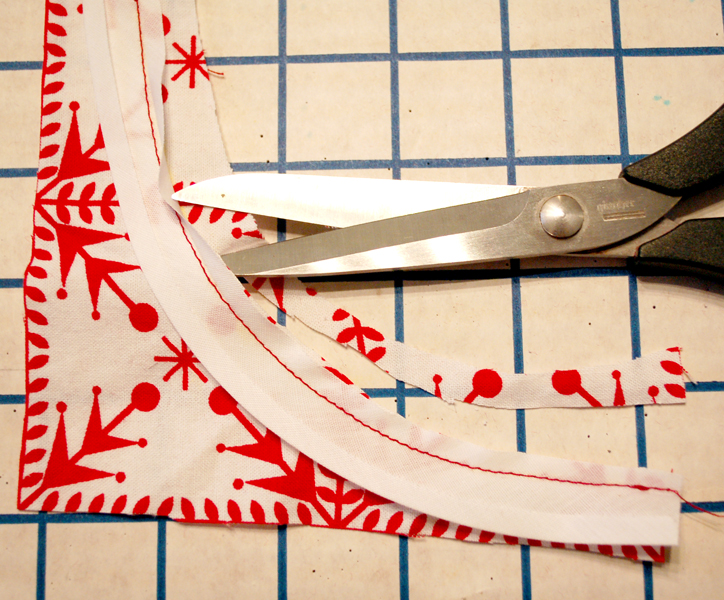
Stitch this seam, then trim away the excess seam allowance on the self fabric piece.
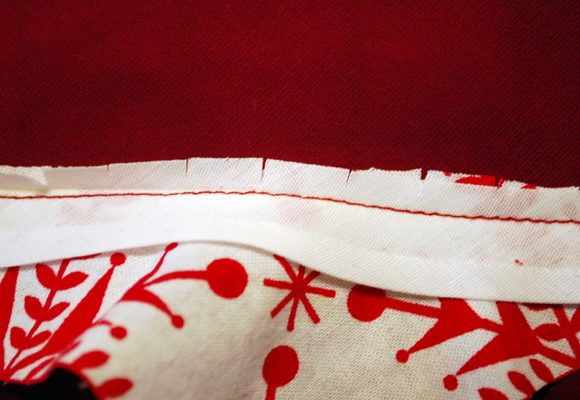
Clip your curves, going close to the stitch line, but not all the way right up to it. When you turn your facing to right side out it will make your seam allowance fan out and keep it from bunching underneath. Clipping curves helps them to lay flat.
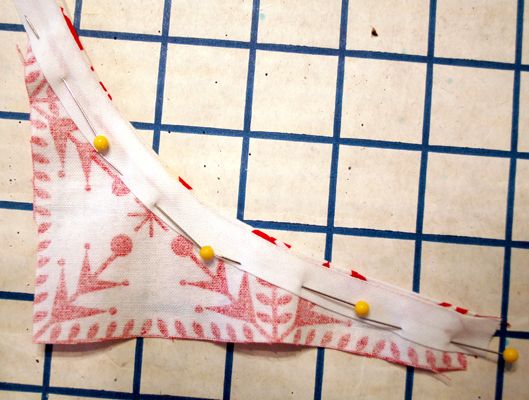
Pin your bias facing to place. DO NOT press seam allowance upward, as we did in previous posts, as this will undo the nice pressed curve we did earlier in this post. Pin the facing to place so it lays flat and smoothly.
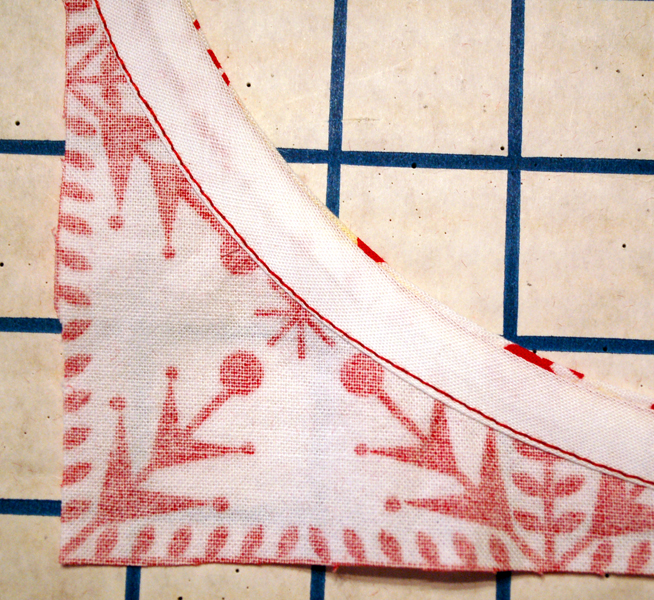
Stitch your bias facing down, close to the bias fold edge. Give your garment a final press.
That’s it! Now you know how to face inside curves with bias binding. This technique is really handy for necklines and armholes.
Hurrah! We made it to the last post of the bias facing and bias binding tutorials!
In this post we’re going to look at facing scallops, or inside corners. Learning this technique comes in handy for doing the 1940′s Apron Pattern, but also for binding squared, v neck, or sweetheart necklines.
We’re building upon techniques already learned in the prior binding/facing tutorials, so if you feel lost or missed the previous posts you can find them here.
There are a lot of ways to miter inside corners. For this tutorial I’m going to show you the technique I use. If you use another method please feel free to leave a comment or link!
Mitering Inside Corners or Scallops
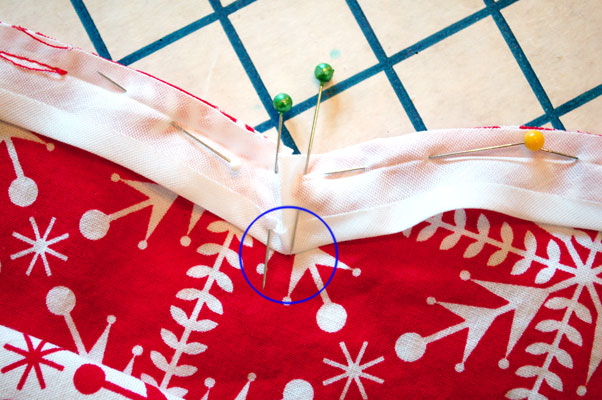
We’ve already learned how to attach bias facing to a straight edge, and we’ve learned how to miter inside corners with bias binding. You’re going to combine those two types of techniques when you do your inside corners with bias facing. Just like with your bias binding, the most crucial part of getting inside corners right with bias facing is going to be that inside point. You can see we’ve pinned the bias facing along the edge (for this one the seam allowance is 1/4″, the same as the bias tape seam allowance). Pin until you get to the corner. See the point inside the circle? That is the most crucial part. We want to get that point right, so that the bias binding will lay flat along the inside of the piece at both the scallop you just did, and the scallop to come, and not pull or pucker at the point. Ease in the excess at the cut edge like a tuck (this is called a miter). Do the same for every scallop, or every corner you need to bind.
Please click the link below to continue reading. If you don’t see a link, you’re in the right place!
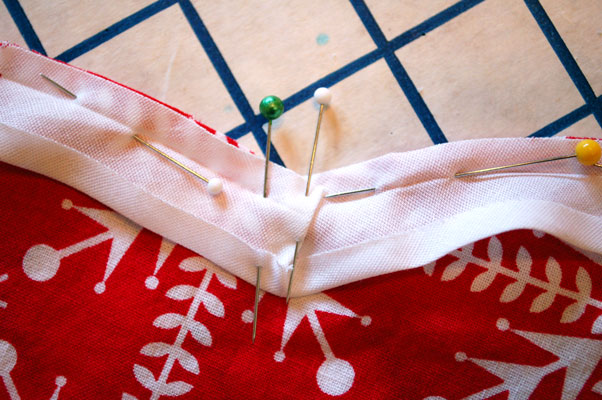
I use another pin to secure down the miter (the tuck) before sewing on my machine, to keep it from moving.
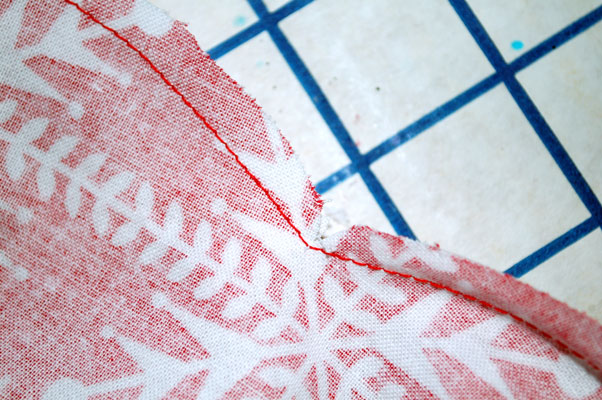
Go slowly, stitching by machine, and pivot with your machine in “needle down” position when you get to your points. When you’re done, clip your points to make them lay flat when you flip your bias facing to the inside.
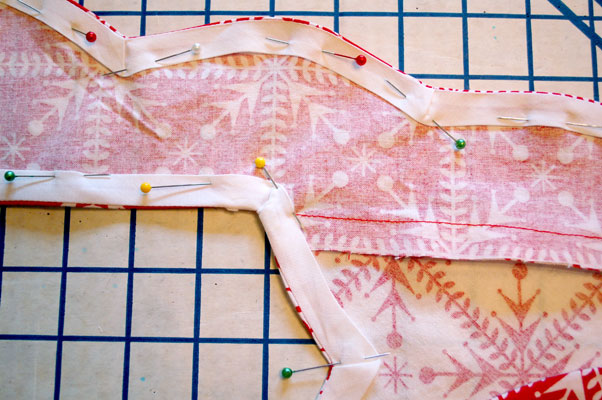
Turn your facing to the inside of the garment. Make sure you get the curves of the corners nice and smooth. If you need to, go back and clip curves or points as needed to make it lay flat. Give the facing a good press to make your edges crisp. Here you can see my scallops and neckline flipped to the inside of the garment, all pinned and ready to sew! Go slowly and stitch by machine, removing the pins as you go.
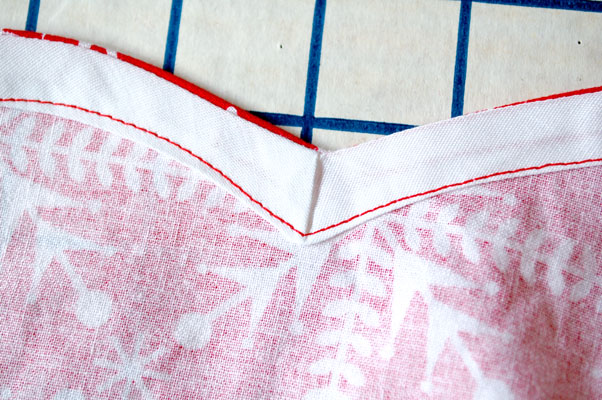
Here you can see a close up on the inside of my scallop after sewn.
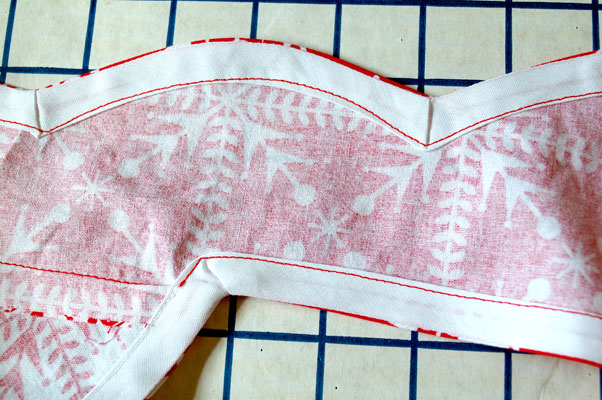
And here you can see another inside shot, showing the neckline edge and the scallops. If you’re doing the 1940′s apron in two tone, make sure you change your thread color to match your fashion fabric! You can see where I stitched with red thread to match my red fabric, then switched to white to match the white fabric. Don’t forget to give your garment a final press after stitching!
I hope you have found these tutorials useful, and I hope they help you to feel confident whenever you have a project that involves bias facing or bias binding!